- Home
- Fantasy Art Crafts And Activities
- Easy Fairy Face Painting
Easy Fairy Face Painting
Easy fairy face painting is one of the most magical ways to transform any child into an enchanting magical fairy. Whether you're preparing for a birthday party, Halloween, or just a fun afternoon at home, fairy face painting opens up a world of creativity and wonder.
The best part? You don't need to be a professional artist to create stunning fairy looks that'll make any child feel absolutely magical. With just a few basic supplies and some simple techniques, you can master the art of fairy face painting and bring smiles to children's faces everywhere.
Don't forget - adults can have a beautiful fairy face too!

Easy Fairy Face Painting
Materials
Paints
Before diving into your fairy face painting adventure, let's talk about the essential materials you'll need. The foundation of any great face painting project starts with high-quality, skin-safe paints.
Professional water-based face paints are your best bet – they're specifically formulated for skin contact, wash off easily with soap and water, and won't cause irritation like craft paints might. Brands like Snazaroo, Mehron, and TAG are popular choices among face painters because they blend smoothly and provide vibrant colors that really pop.

Snazaroo have a great Face Paint Party Kit that includes glitter. Click here for more information and to purchase.
Brushes

Your brush collection is just as important as your paint selection. You'll want to have a variety of brushes on hand, including flat brushes for covering larger areas, round brushes for details, and liner brushes for those delicate fairy features.
A good starter set should include brushes ranging from size 2 to size 12. Don't forget about makeup sponges – they're perfect for creating smooth base colors and blending effects that give fairy faces that ethereal, otherworldly glow.
You can purchase the above set here.

Water Containers
Water containers and paper towels are often overlooked but absolutely essential supplies. You'll need clean water to rinse your brushes between colors and damp paper towels to keep your workspace tidy.
Pro tip: use two water containers – one for cleaning brushes and another with fresh water for mixing paints. This keeps your colors bright and prevents muddy mixing that can ruin your fairy masterpiece.
Glitter

Glitter is where fairy face painting really comes alive! Cosmetic-grade glitter adds that magical sparkle that makes fairy faces truly enchanting. Look for fine, polyester glitter that's specifically designed for face painting – it's safer than craft glitter and creates a more professional finish.
You can apply glitter over wet paint or use a glitter gel for easier application. Silver, gold, and iridescent colors work beautifully for most fairy designs.
Easy Fairy Face Painting
Designing your Fairy Face
The classic fairy face design starts with creating delicate wings around the eyes. This fairy face painting technique involves using light, pastel colors like pink, purple, and blue to create wing shapes that extend from the outer corners of the eyes toward the temples.
Start by sketching the wing outline with a liner brush, then fill in with your chosen colors using a flat brush. The key is to keep the colors soft and blend them gently for that dreamy fairy effect.

Adding dimension to your fairy wings makes all the difference in creating a professional-looking design. Use a darker shade of your base color to outline the wings and add vein-like details that mimic real butterfly or dragonfly wings.
Then, highlight certain areas with white or a lighter shade to create depth. This layering technique transforms simple painted shapes into realistic, three-dimensional fairy wings that seem to flutter right off the face!
Easy Fairy Face Painting
Flower Fairy Design
Flower fairy designs are incredibly popular and perfect for spring and summer events. Start with a base of soft pink or peach around the eyes and cheeks, then add delicate flower petals using small round brushes.
Roses, daisies, and cherry blossoms work particularly well for this fairy themed face painting style. Don't forget to add green leaves and tiny stems to complete the garden fairy look. A touch of yellow in the flower centers brings the whole design to life.
 A pretty flower design
Glitter Fairy Design
For those who love sparkle and glamour, the glitter fairy design is absolutely stunning. Begin with a base of light blue or purple around the eyes, creating a mask-like shape.
While the paint is still slightly damp, apply cosmetic glitter generously over the painted areas. Add silver or white highlights around the edges and don't forget those essential fairy wing details. This design catches the light beautifully and photographs amazingly well.
Butterfly Fairy Design

Butterfly fairy combinations offer the best of both worlds – the grace of butterflies with the magic of fairies. Paint colorful butterfly wings that extend across both eyes, using bright colors like orange, yellow, and red for monarch butterfly effects, or blues and purples for a more mystical look.
Add the butterfly body down the center of the nose, and finish with delicate antennae curving up from the forehead. It's a show-stopping design that works for both children and adults.
Simple Design
Don't overlook the power of simple fairy accents that can transform any face into something magical. Sometimes, less is more, especially for younger children who might not sit still for elaborate designs.
Simple fairy dust scattered across the cheeks with glitter, small flowers painted on one cheek, or delicate swirls and stars around the eyes can create beautiful fairy looks without overwhelming little faces.

Quick fairy fixes can save the day when you're working with wiggly children or tight time constraints. Simple designs like fairy cheek art – small flowers, butterflies, or stars painted on just one or both cheeks – can be completed in just a few minutes but still deliver that magical fairy feeling. These mini designs are perfect for large events where you need to paint many faces quickly.
Easy Fairy Face Painting
Fairy Colors
Color combinations can make or break your fairy face painting design. Soft pastels like lavender and mint green create gentle, dreamy fairies, while bold combinations like hot pink and electric blue make for more dramatic, party-ready looks.
Earth tones like browns and greens work perfectly for woodland or garden fairy themes. Don't be afraid to experiment with unexpected color combinations – sometimes the most magical results come from trying something new.
 A woodland fairy
Application Techniques
Preparing the child's face properly ensures your fairy face painting will look its best and last longer. Start with a clean, dry face – use a gentle baby wipe to remove any dirt or oils.
If the child has sensitive skin, do a small patch test with your paint first. Make sure the child is comfortable and sitting at the right height so you can work without straining your back or rushing through the design.
Application techniques can elevate your easy fairy face painting from amateur to professional-looking. Always work with slightly damp brushes and build up your colors gradually rather than trying to get full coverage in one stroke.
Use gentle, sweeping motions for wing shapes and light dabbing motions when applying glitter. Take your time with details – they're what make fairy faces truly special.

Safety should always be your top priority when face painting. Never use craft paints, markers, or any products not specifically designed for skin contact.
Avoid painting around the immediate eye area and lips, and always ask about allergies before starting. Keep your brushes and sponges clean, and don't double-dip into paint containers. If a child shows any signs of irritation, remove the paint immediately with gentle soap and water.
Seasonal Fairies
Seasonal fairy variations keep your designs fresh and relevant throughout the year.
Spring fairies can feature pastel flowers and butterflies, summer fairies might include bright suns and rainbows, autumn fairies could showcase warm oranges and falling leaves, while winter fairies can sparkle with snowflakes and icy blues.
Adapting your fairy face painting to the season makes each design feel special and timely.
 Winter themed face painting
Advanced Techniques
Advanced fairy face painting techniques include creating texture effects that add realism to your designs. Use a sea sponge to create cloud-like effects in the background of your fairy wings, or stipple with a brush to create a textured, magical atmosphere.
Dry brushing techniques can add subtle highlights that make your fairy faces glow, while wet-on-wet blending creates smooth color transitions that look absolutely professional.
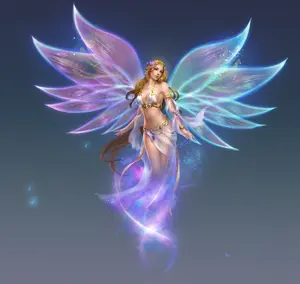
You could create an actual fairy image as in the picture below, if you have great artistic talent!

Incorporating storytelling into your fairy face painting experience makes the whole process more engaging for children.
As you paint, tell them about the type of fairy they're becoming – is she a flower fairy who helps gardens grow, or a moon fairy who guides dreams? This narrative approach keeps children entertained and still while you work, and makes the final result feel even more magical and personal.
Photography Tips
Photography tips can help you capture your fairy face painting masterpieces beautifully. Natural lighting works best for showing off the true colors and glitter effects.
Take photos from slightly above the child's face to capture the full wing designs, and don't forget close-up shots that show off your detailed work. These photos become treasured memories for families and great portfolio pieces for your face painting skills.

Removal of Face Paint
Removal and aftercare are just as important as the application process. Always provide parents with removal instructions – gentle soap and warm water usually do the trick, but makeup remover or baby oil can help with stubborn glitter.
Advise parents to be gentle around the eye area and to moisturize the skin afterward if needed. Proper removal ensures the child's skin stays healthy and happy.

Create the Magic!
The magic of easy fairy face painting lies not just in the final result, but in the joy and wonder it brings to children's faces.
Every time you transform a child into a fairy, you're giving them permission to believe in magic, to feel special and beautiful, and to let their imagination soar.
Whether you're a parent creating magical moments at home or someone considering face painting as a hobby or business, remember that the real magic happens when you see that spark of delight in a child's eyes as they see their fairy transformation for the first time.
Most of the images on this page are courtesy of Pinterest.
Book of the Month

The Best Selling Fae Fantasy Book! A great gift!
CLICK HERE for more information and best price!
Recent Articles
-
Air Fairies Belong To The Group Of Elemental Fairies
Apr 28, 26 02:27 PM
 Air fairies, also known as sylphs, are magical beings connected to the element of air. These ethereal creatures have inspired wonder and fascination.
 -
Places And Things Named Fairy - Ponds, Penguins, Bridges and Cakes!
Apr 24, 26 07:14 AM
 Find out about all the places and things named Fairy. Things called 'fairy' include ponds, bridges, penguins, cakes and more!
 -
Fairy Locations Breath of the Wild
Apr 24, 26 06:14 AM
 Fairy Locations Breath of the Wild! How to survive and thrive in Hyrule and find the Great Fairy Fountains - where to go and what to expect when you get there!